How To Launch Google Ads In 2023: Step-By-Step Guide
Millions of people at this very moment are searching for something: clothes, food, travel destinations, medicines – the list goes on and on. The good news is that you can easily target exactly those who’re looking for something you offer and voila! Both of you get what you want!
Google Ads allows you to catch your audience’s attention and actually turn them into your clients. It’s an, effective tool every digital marketer and online business owner should master. Millions of affiliates benefit from Google Ads monthly by setting up ad campaigns and generating traffic for affiliate programs.
Today we will guide you through launching an ad campaign with Google Ads step by step, so you can immediately try it yourself.
The first thing we’d like to mention before we actually begin – there are different interfaces of Google Ads. The interfaces might differ for different countries, however the key features stay the same. So if what you see on your screen is different from our pictures, it’s most probably because Google Ads interface looks a bit different in your country or there might be some new updates made by Google, and let’s say there are always a bunch of updates Google releases.
Now let’s delve into the Google Ads world!
Step 1. Go to ads.google.com, click get started and “Switch to expert mode”
First of all, you will need a Google account to set up Google Ads. It’s absolutely free to create one, so if you don’t have a Google account, you may want to create it now to launch ads.
Ok, so now when you’ve created your Google account, just go to ads.google.com and click “get started”.
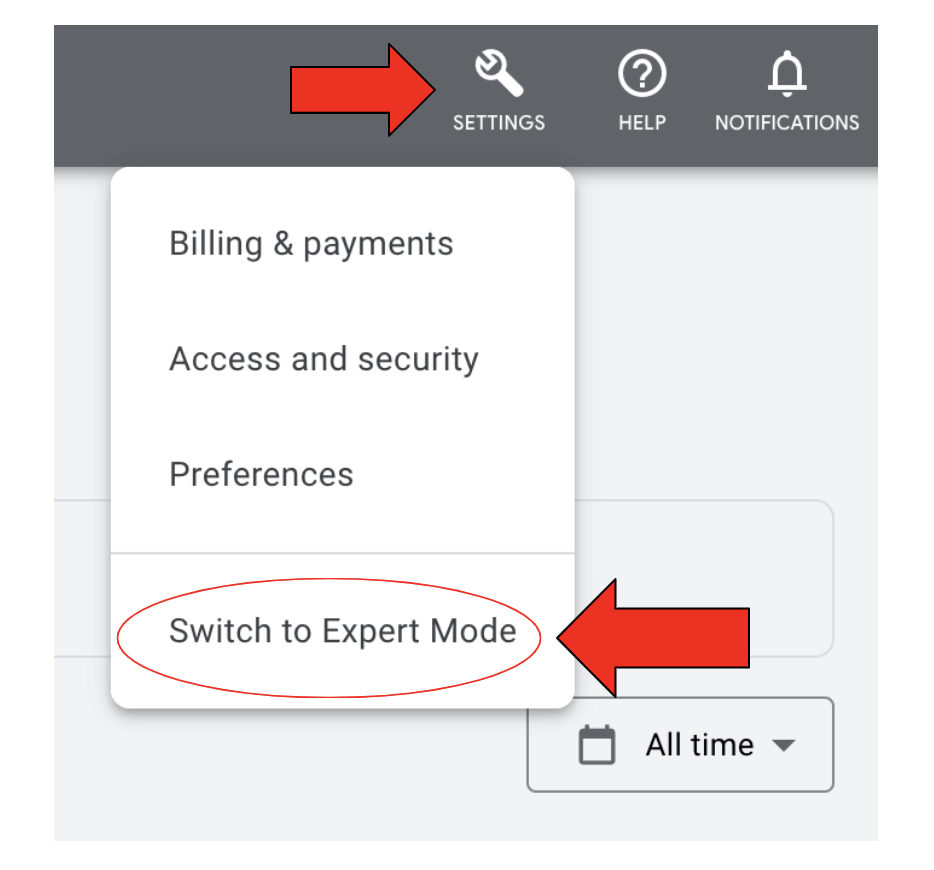
After creating your account, Google will guide you in setting up a Smart campaign, which is a decent choice. However, developing your personalized campaigns is significantly more advantageous because it enables you to meticulously select and target your preferred audience. So we will focus on the latter option today. Thus, once signed into your Google Ads account, click the Tools icon in the top right corner and select “Switch to Expert Mode”:
Step 2. Pick your campaign type
On this step Google will first ask you to choose an objective.
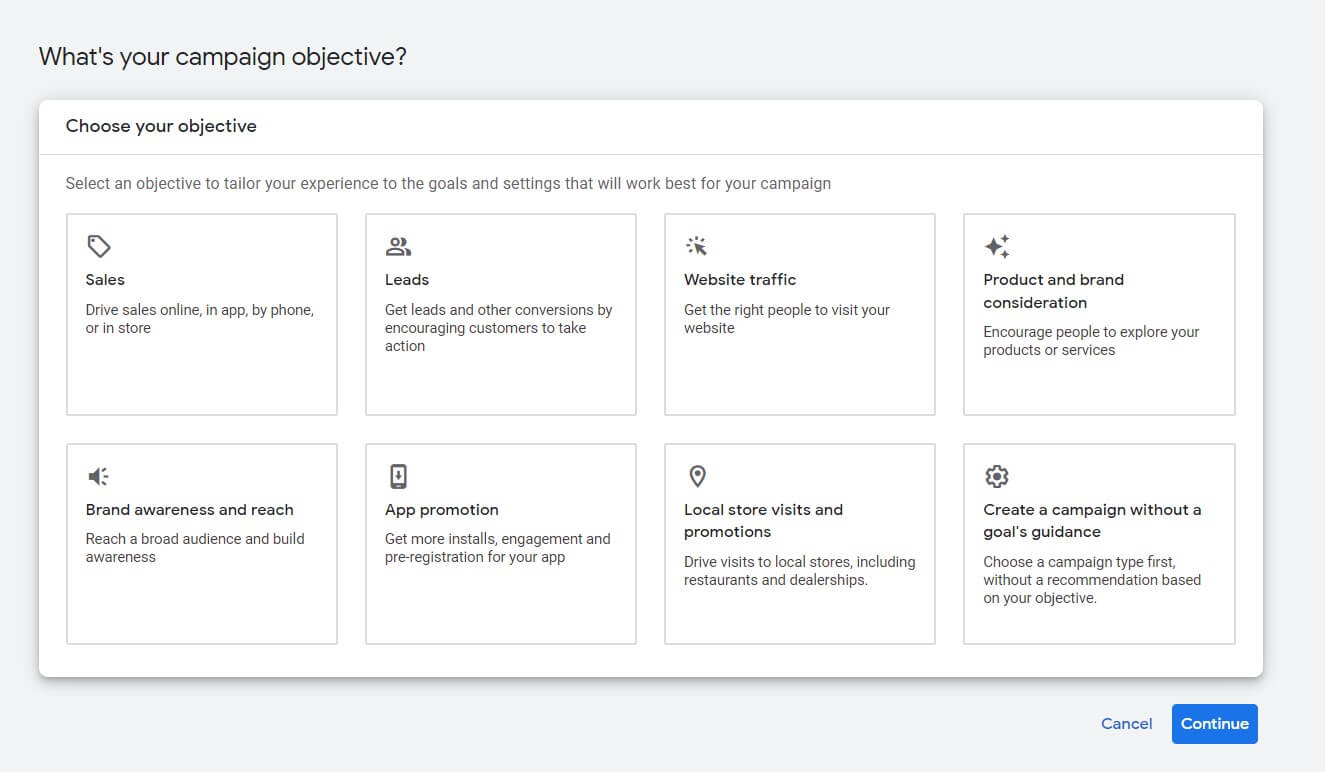
Campaign objectives in Google Ads are the specific goals or outcomes that you want to achieve with your ad campaign. Google Ads offers various campaign objectives to choose from based on your business needs and marketing goals. When creating a new campaign in Google Ads, you’ll need to select one of the following campaign objectives:
- Sales: This objective is ideal if your primary goal is to increase sales or conversions on your website.
- Leads: This objective is ideal if you’re looking to generate leads or sign-ups for your products or services.
- Website traffic: This objective is ideal if your goal is to increase the number of people visiting your website.
- Product and brand consideration: This objective is ideal if you’re looking to increase consideration for your brand or products.
- Brand awareness and reach: This objective is ideal if your goal is to increase brand awareness and reach a wider audience.
- App promotion: This objective is ideal if you want to promote your mobile app and drive more app installs or in-app actions.
- Local store visits: This objective is ideal if you have a physical store and want to drive more foot traffic to your location.
- Create a campaign without a goal’s guidance: While it is possible to run a successful Google Ads campaign without goal guidance, setting clear goals and using the available optimization tools can help you get the best possible results for your campaigns. This is because setting clear goals for your campaign can help you focus your efforts and allocate your budget more effectively.
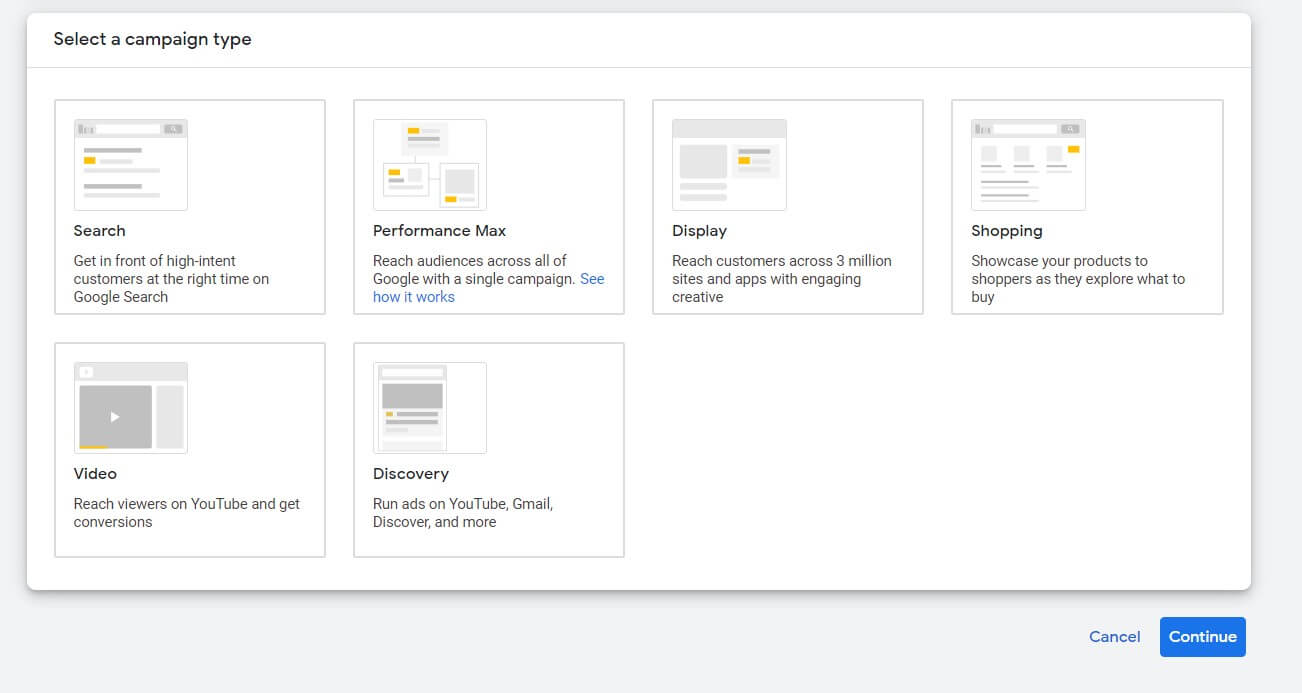
Depending on your objective, it will then show you which campaign types are available. Now we can see what campaign types are available:
Step 3. Click to create conversion action and install the tracking code to your website
Right below on the same page you will see a window where Google asks you to create a conversion action and install a tracking code.
![]()
When you launch a Google Ads campaign, you need to monitor and measure its effectiveness, and Google took care of that too. Creating a conversion action and installing a tracking code on Google Ads is crucial for tracking the success of your advertising campaigns and understanding the return on investment (ROI) of your advertising efforts.
A conversion action is an action that a user takes on your website after clicking on your ad, such as making a purchase, filling out a form, or subscribing to a newsletter. By creating a conversion action, you are telling Google Ads what action you want your users to take, and Google Ads can then track how many users complete that action after clicking on your ad.
To track these conversions, you need to install a tracking code on your website. The tracking code is a small snippet of code that you place on the page where the conversion action takes place. This code sends data back to Google Ads, allowing you to see which ads and keywords are driving the most conversions and providing valuable insights into the effectiveness of your advertising campaigns.
You have three options for installing the tracking code: directly downloading a code and placing it on the website by yourself, emailing the instructions to your webmaster in case you have someone else who manages your website or using Google Tag Manager.
Step 4. Pick your bid strategy
There are different ways Google can spend your budget, depending on your goals.
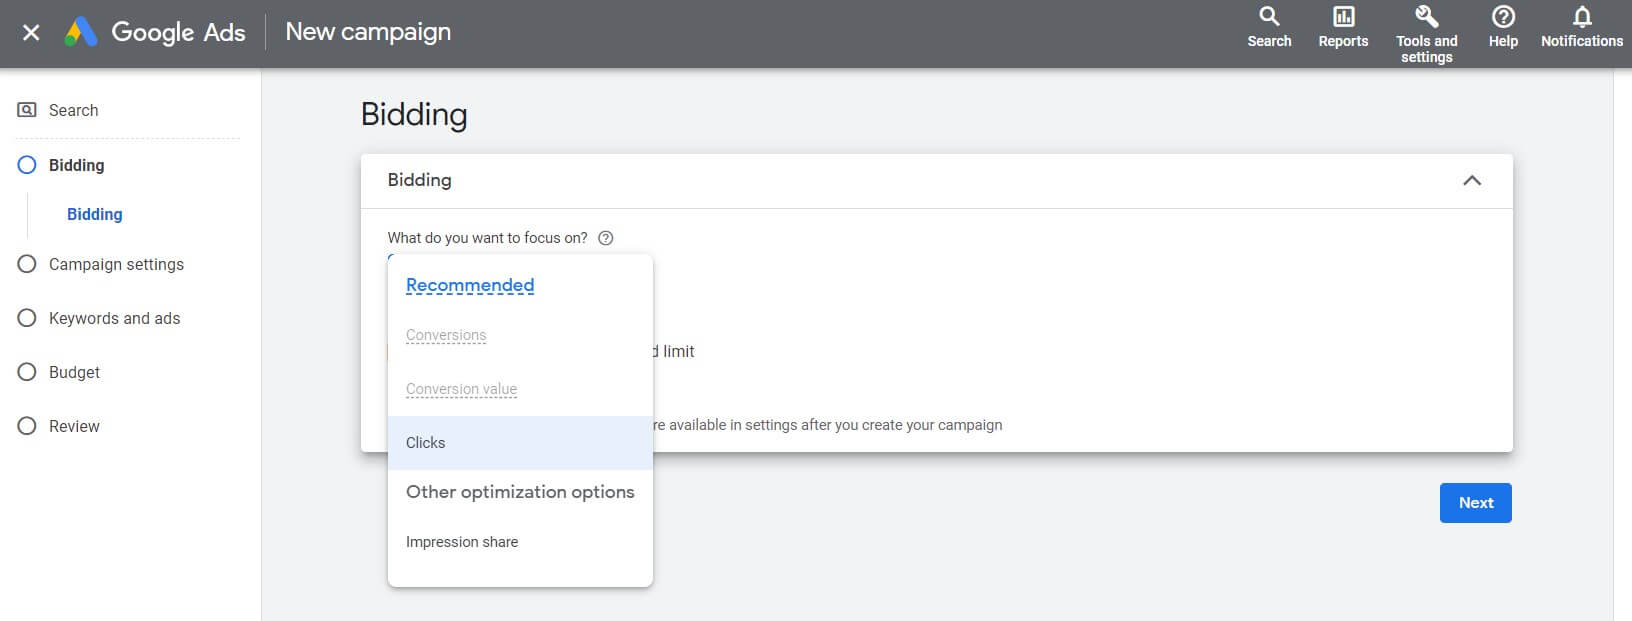
Bidding on Google Ads refers to the process of setting a maximum amount you are willing to pay for each click on your ads. When someone searches for a keyword related to your product or service, and your ad is eligible to appear, your bid amount will be considered, along with other factors such as ad relevance, landing page experience, and expected click-through rate, to determine the ad’s position on the search results page or other ad placement.
Manual bidding and automated bidding are two different approaches to managing your bids in Google Ads.
Manual bidding involves setting your bids for each individual keyword or ad group manually.
Automated bidding, on the other hand, uses machine learning algorithms to set your bids for you.
To pick your bid strategy, select the bidding type suitable for your campaign. We will choose clicks here.
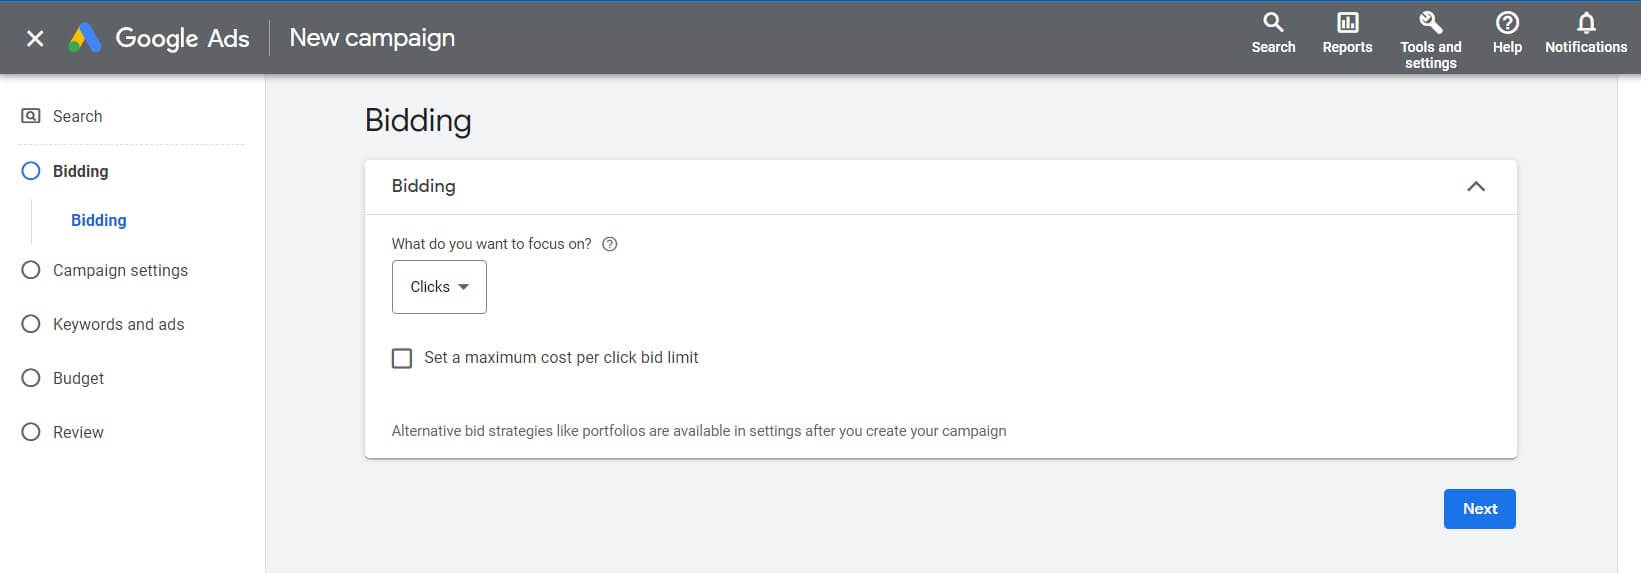
Step 5. Set up your campaign: choose a network
Let’s step into campaign settings:
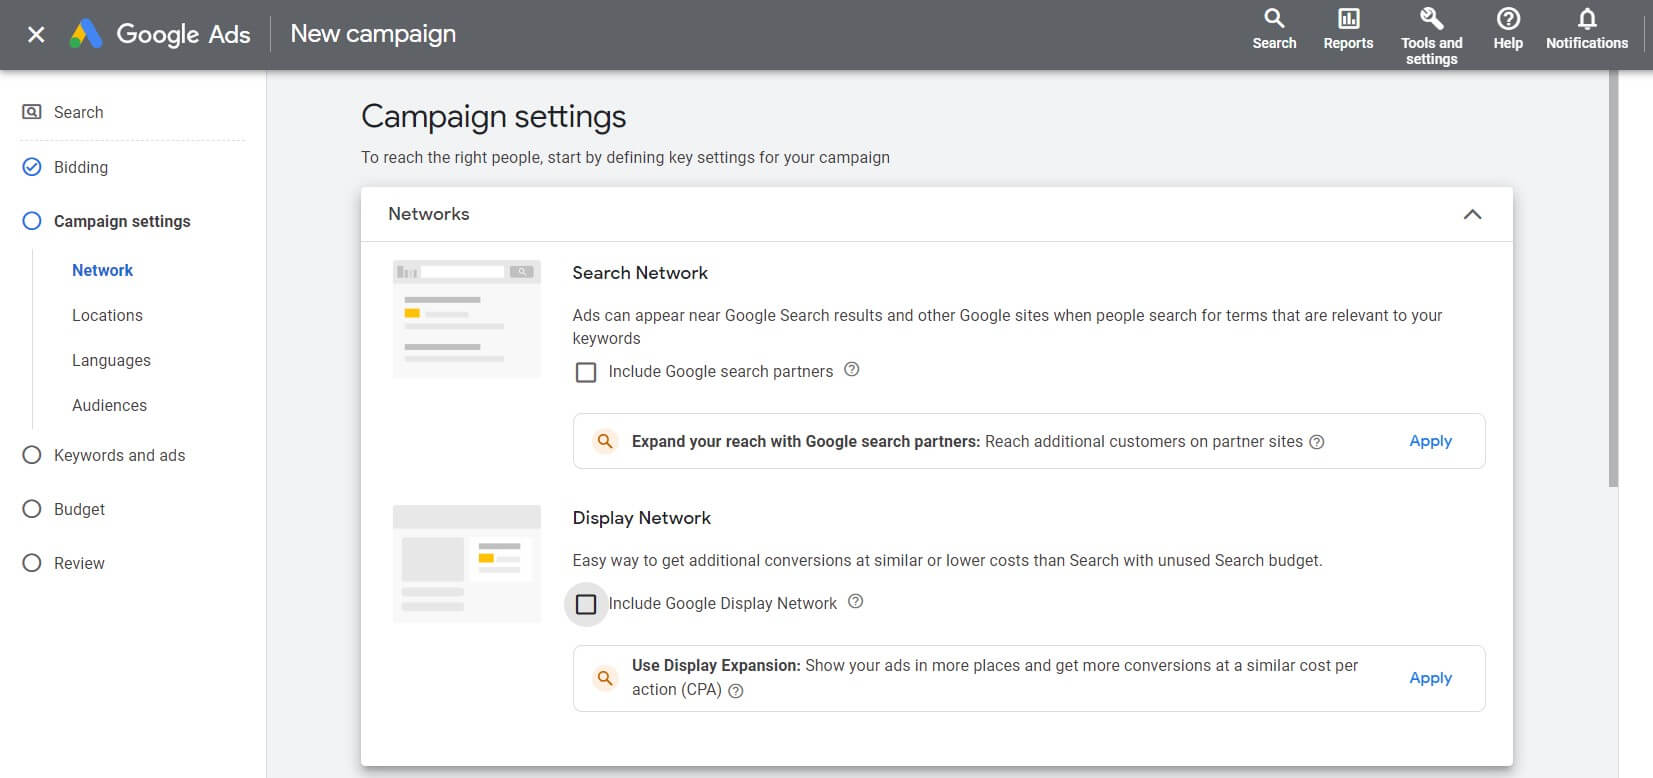
Here you’re up to choose the suitable network, which simply refers to the group of websites, apps, and other online platforms where your ads can appear. Google Ads offers two main networks where your ads can be shown:
- Search Network
The Google Search Network is a group of search-related websites and apps where your ads can appear. When you advertise on the Google Search Network, your ad can show near search results when someone searches with terms related to one of your keywords.
Running ads on the Search Network is the most common, well-known form of PPC advertising. With this network selection, your ads will be eligible to appear on Google SERPs.
- Display Network
Google Display Network (GDN) is a network of millions of websites, mobile apps, and videos that have partnered with Google to show ads. The network includes popular websites such as YouTube, Gmail, and Blogger, as well as a wide range of third-party websites and apps that have opted to display Google ads. According to Google, the GDN includes over 2 million sites that reach over 90% of global internet users. Given the expansiveness of this network, it is incredibly appealing to advertisers who are looking to expand their online presence.
Which one to choose?
| Google Search Network | Google Display Network |
|
|
Keep in mind though, you actually have the options to deselect “Google Search Partners” and “Display Expansion” when setting up the Search Network. It is recommended to do that, so the campaign solely runs on Google Search Network.
Step 6. Choose locations and languages
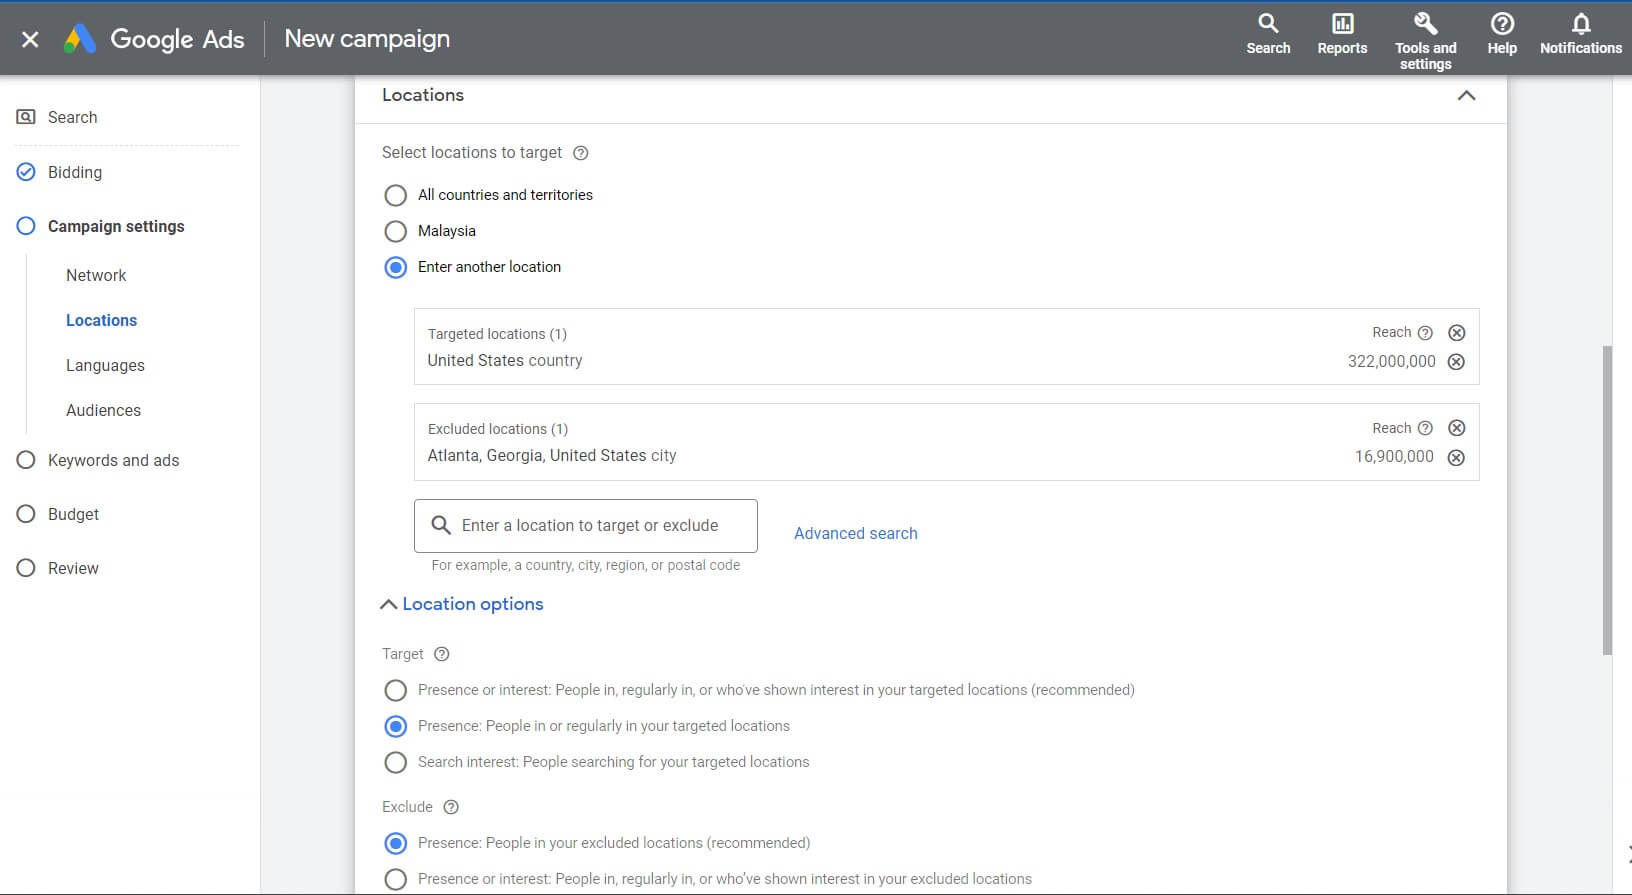
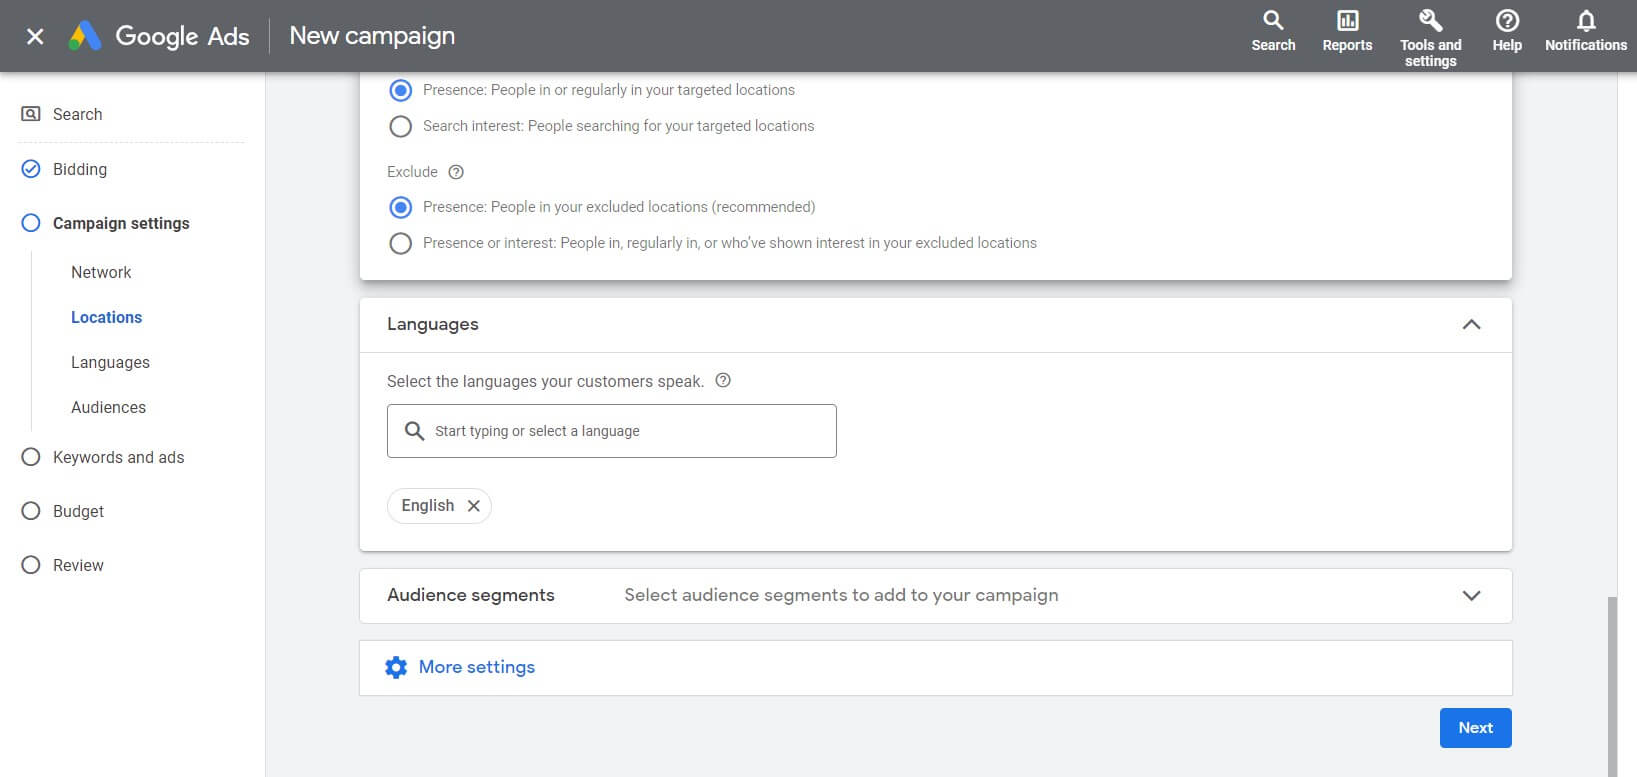
On this step you’re choosing preferred targeted locations and languages of your customers.
We choose “Presence people in or regularly in your targeted location” and recommend you too, if you want to target people who actually are or regularly visit the targeted location.
However, keep in mind: Google Ads announced that Starting in March 2023, “Search Interest” targeting and “Presence or Interest” exclusion will no longer be available in Google Ads.
According to Google, they’re making this change to simplify the location targeting portfolio and to improve ad performance.
Here we choose the languages we’re targeting:
Step 7. Choose audiences
Google Ads has four categories of “pre-packaged” audiences, which are available for all advertisers:
- Demographic targeting: this category includes audiences based on demographic data such as age, gender, parental status, and household income. Advertisers can target specific age groups, genders, and other demographics to ensure their ads reach the most relevant audience.
- Affinity segment targeting: for reaching people with similar hobbies/habits, e.g., beauty & wellness, food & dining, etc.
- In-market segment targeting: in-market Audiences are users who are actively searching for a specific product or service. Google identifies these audiences based on search behavior and purchase intent. Advertisers can target these audiences to reach potential customers who are actively looking for what they offer.
- Life event targeting: this means targeting users at their key stages of life, e.g., marriage, menopause, divorce, new home or job, etc.
This is how it looks on your screen:
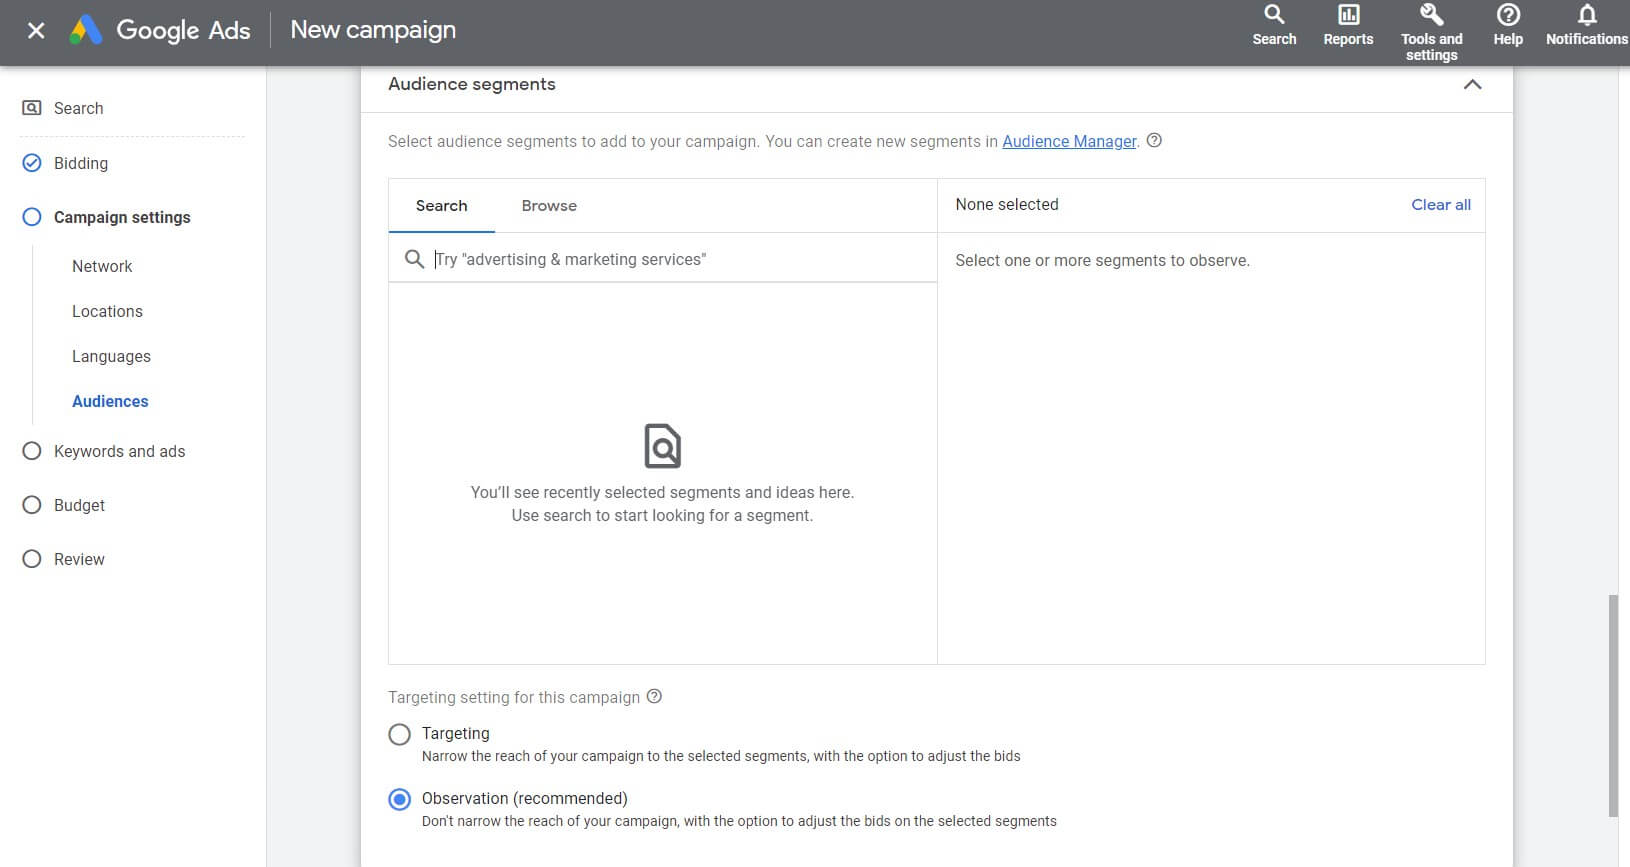
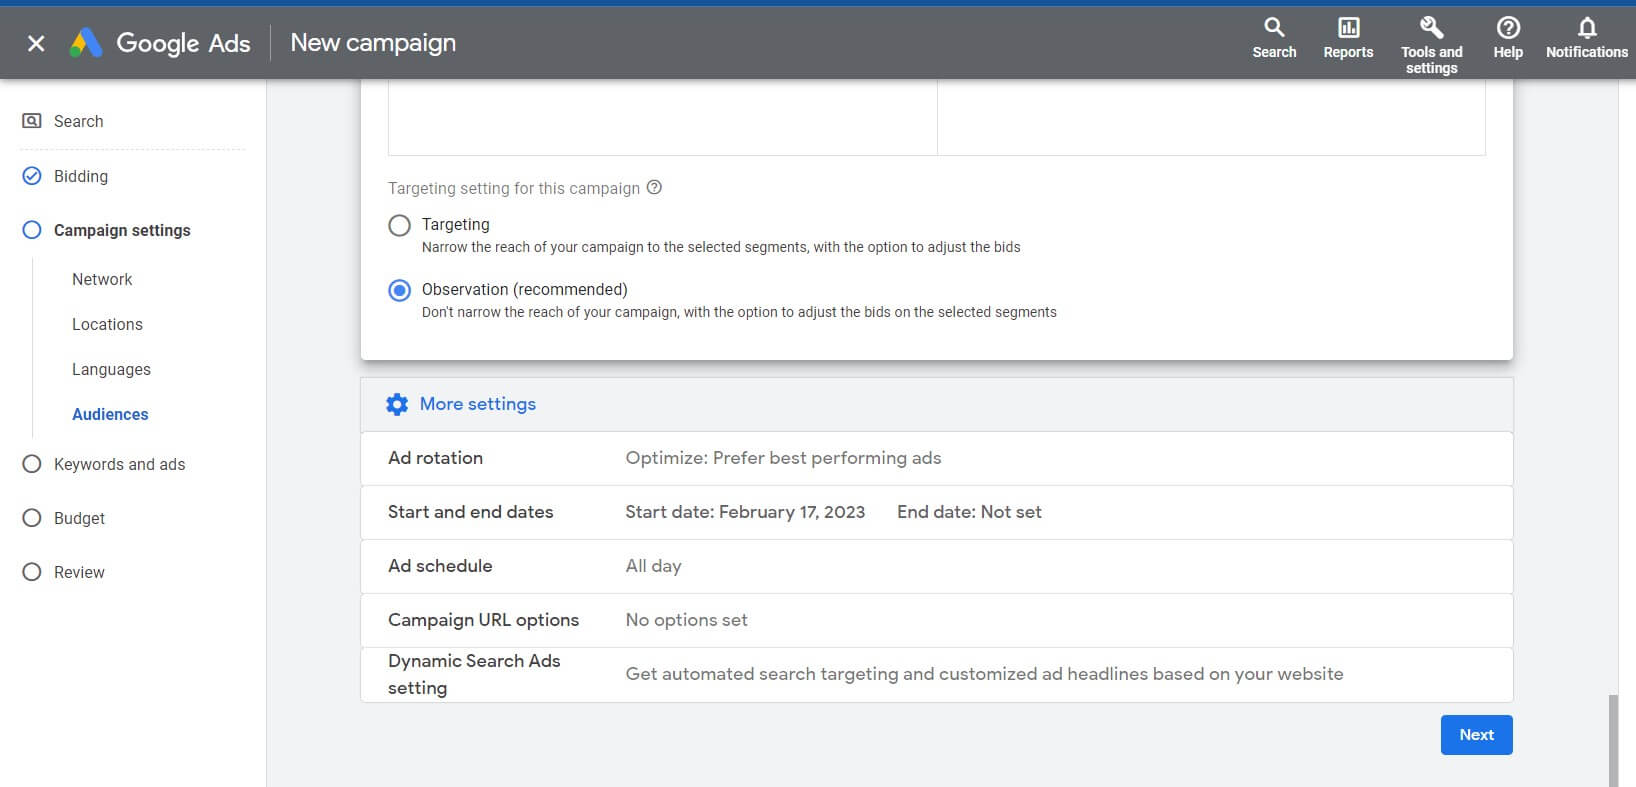
Here are some more settings to optimize your audience’s choice such as rotation, start and end dates, and ad schedule.
Step 8. Set up your keywords
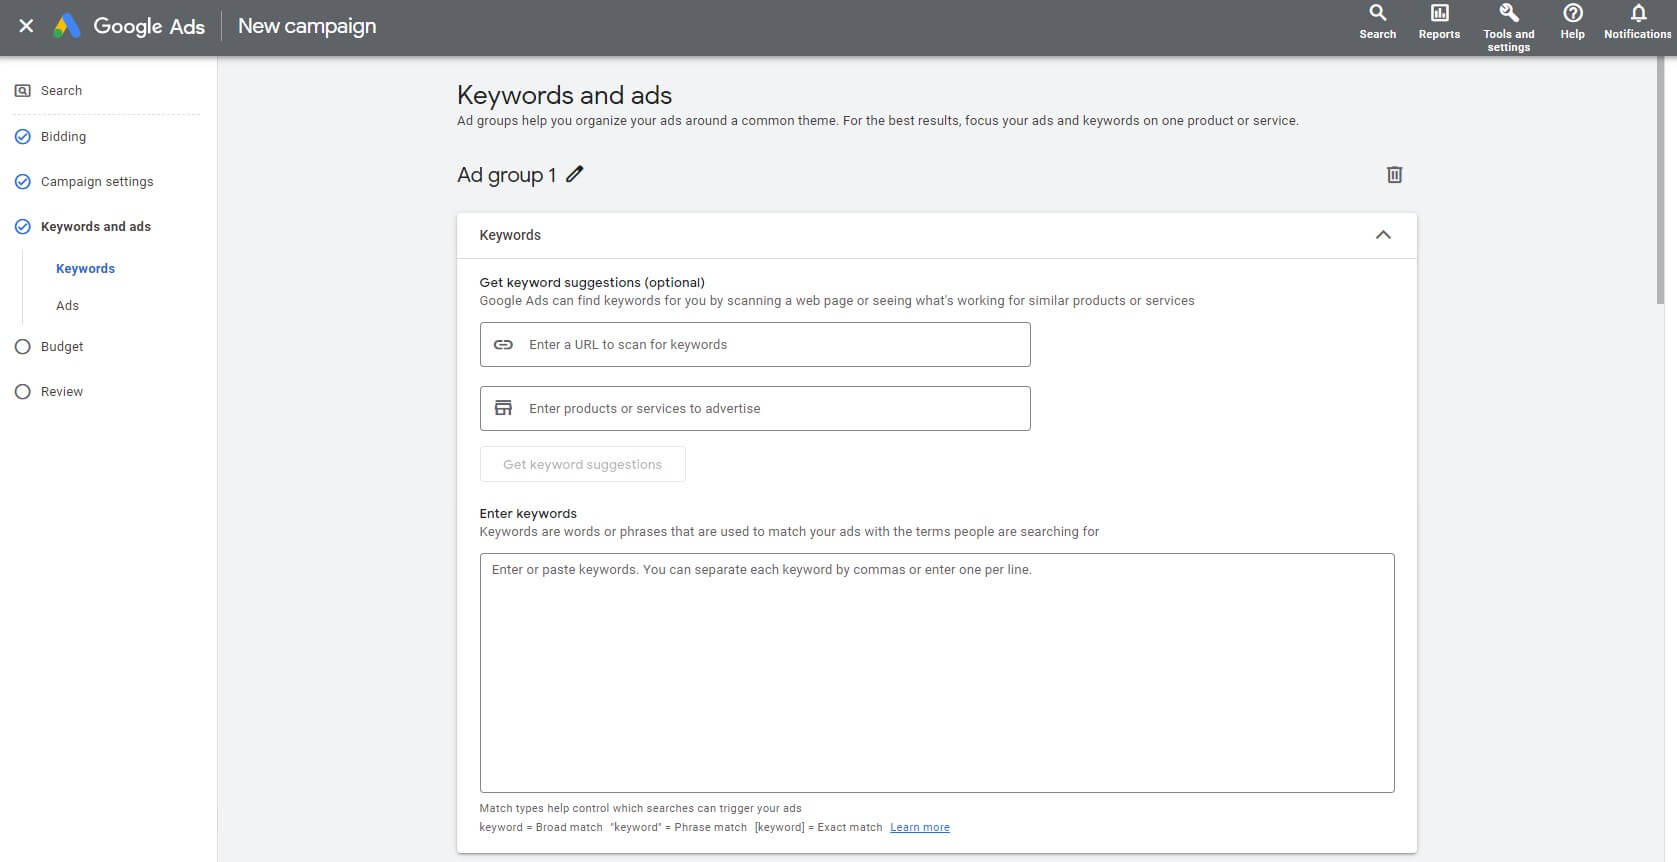
This is one of the crucial steps in campaign planning, as the success of your ad to a great extent depends on the right keywords.
Here’s how your screen will look like on this step:
Never underestimate the power of keywords, they are Kardashians of any PPC campaign.
But how to choose the best ones?
- Brainstorm potential keywords: Think about words or phrases that people might use to search for your product or service. Use keyword research tools: Keyword Planner in your Google Ads account or any other SEO tool you’re comfortable working with to expand your list of potential keywords.
- Focus on relevance: Make sure the keywords you choose are highly relevant to your product or service. Avoid broad, generic keywords that are likely to attract a lot of clicks but not necessarily relevant customers.
- Consider search intent: Look at the intent behind each keyword. Are people using that keyword to research a product or service, or are they ready to make a purchase? Choose keywords that match the intent of your target audience.
- Check for competition: Look at the competition for each keyword. Choose keywords with low to moderate competition to increase your chances of success.
- Use long-tail keywords: Long-tail keywords are more specific and targeted than short-tail keywords. They may have lower search volume, but they also have less competition and can be more cost-effective.
- Test and refine: Set up your Google Ads campaign with a variety of keywords, and monitor their performance closely. Refine your keyword list over time, removing underperforming keywords and adding new ones as needed
When you input your keywords, you’ll also need to choose which match type you want. That’s because there are many queries a person could perform that aren’t identical, but are still relevant to your keywords.
Broad, phrase, and exact matches are keyword matching options in Google Ads that advertisers can use to control when their ads appear in response to a user’s search query.
Broad match: This is the default match type, which allows your ads to appear in searches that include variations of your keyword phrase. This can include synonyms, misspellings, related searches, and other variations. For example, if your keyword is “running shoes,” your ad might appear in searches for “jogging shoes,” “trail running shoes,” or “shoes for runners.” The keywords are inputted without any marks, e.g., running shoes.
Phrase match: This option allows your ads to appear in searches that include the exact phrase you’ve specified, as well as variations that include additional words before or after your keyword phrase or similar to the meaning of your keyword. For example, if your keyword is “running shoes,” your ad might appear in searches for “best running shoes” or “running shoes for women,” but not for “shoes for running” or “running sneakers.” The keywords are inputted in quotes “”, e.g., “running shoes”.
Exact match: This option allows your ads to appear only in searches that exactly match your keyword phrase, with no additional words or variations. For example, if your keyword is “running shoes,” your ad would only appear in searches for “running shoes” and not for “best running shoes” or “running shoes for women.” The keywords are inputted in brackets [ ], e.g., [running shoes].
By using different keyword matching options, advertisers can better control their ad spend and target their ads to the most relevant audience. It’s important to choose the right match type based on your campaign goals and the level of precision you want in targeting your ads.
Step 9. Create your ad
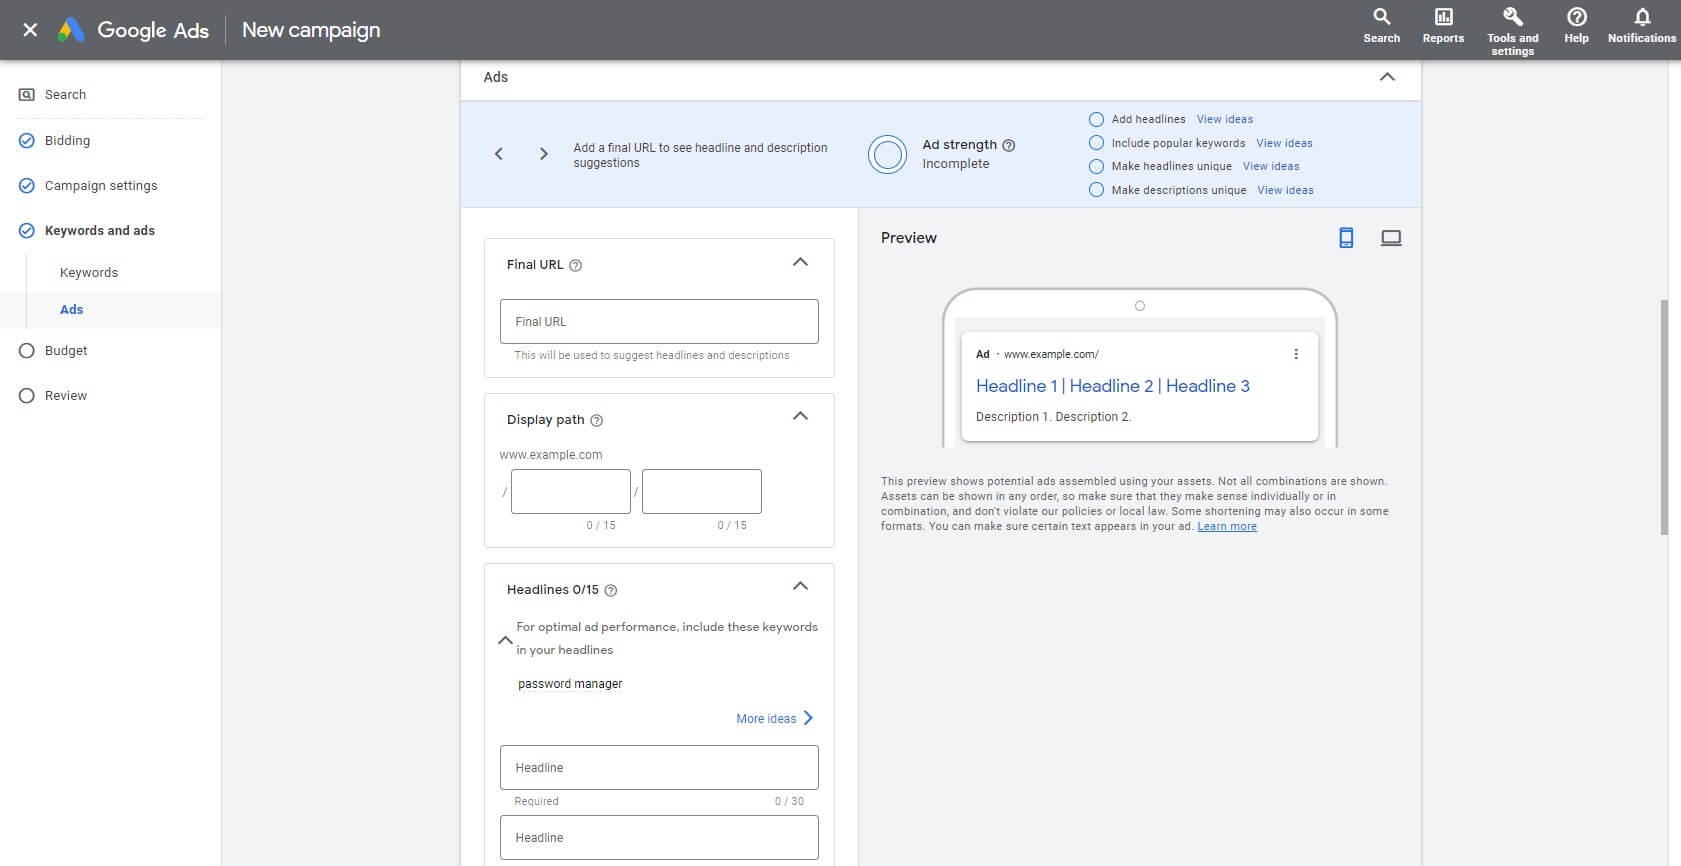
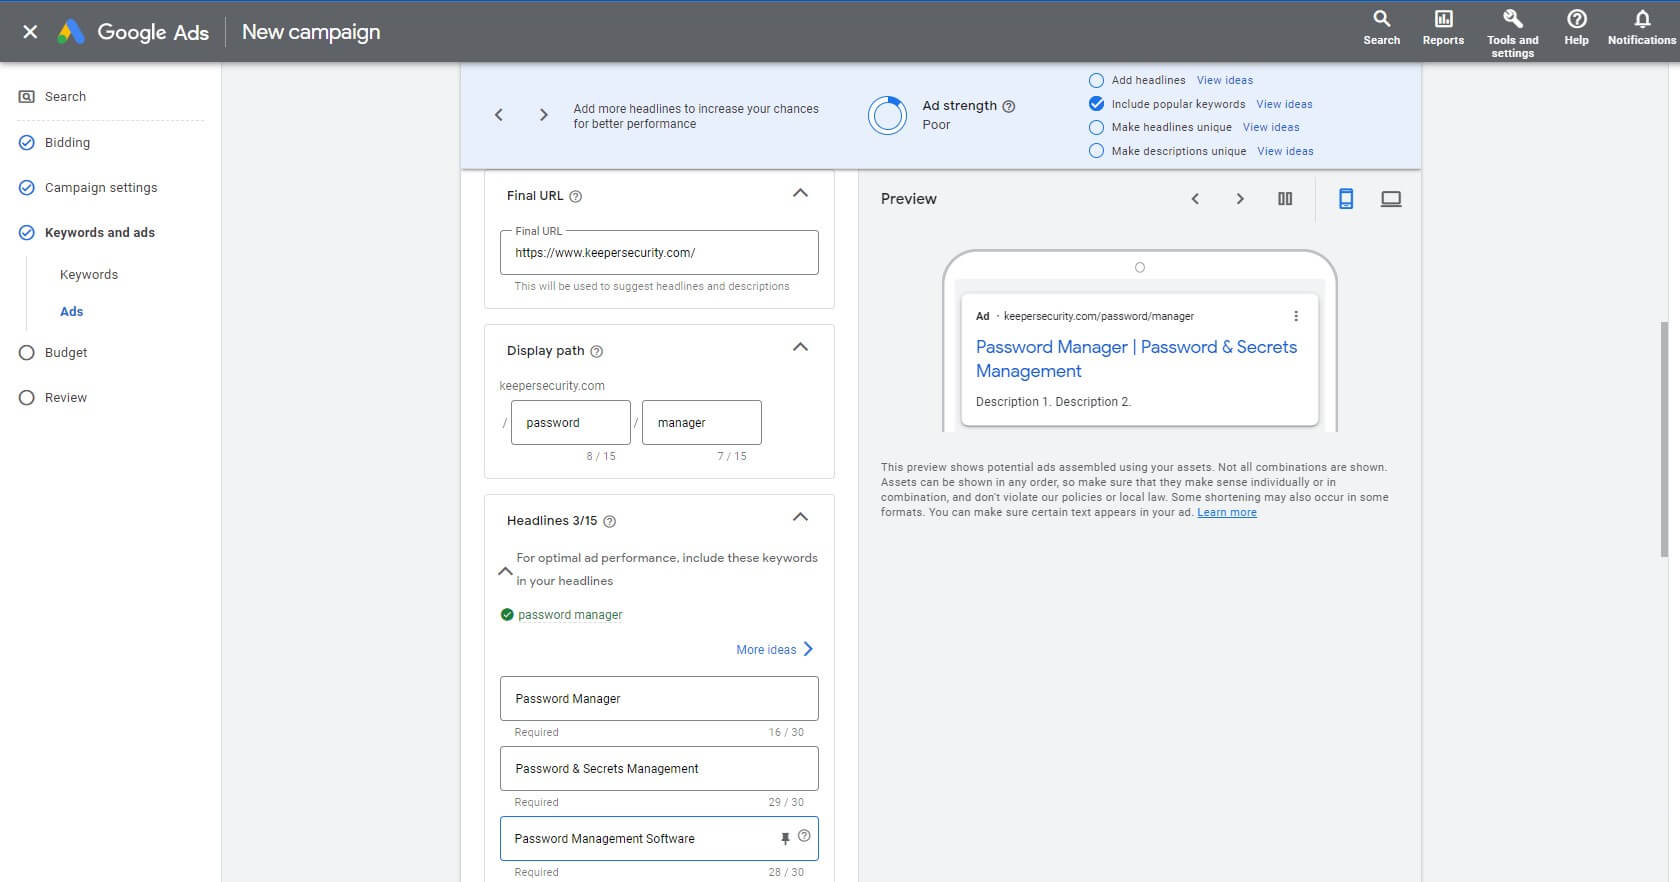
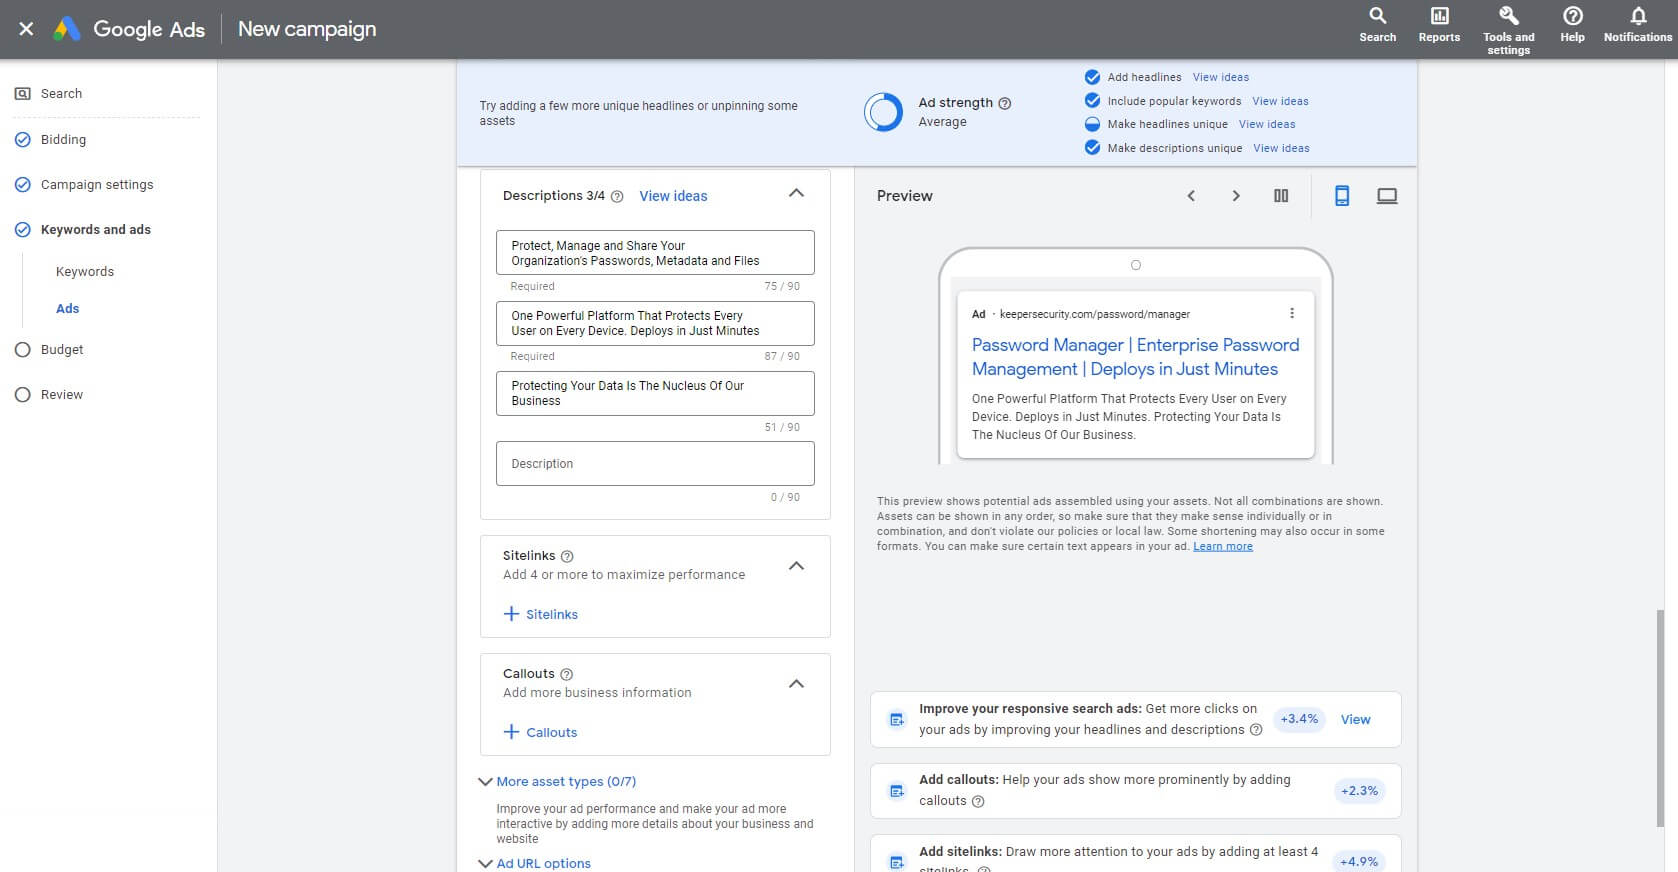
At this step you can edit a final URL, add headlines and descriptions and see how it will look like for a user.
You will see this on your screen:
And this is how it looks after filing in with your information:
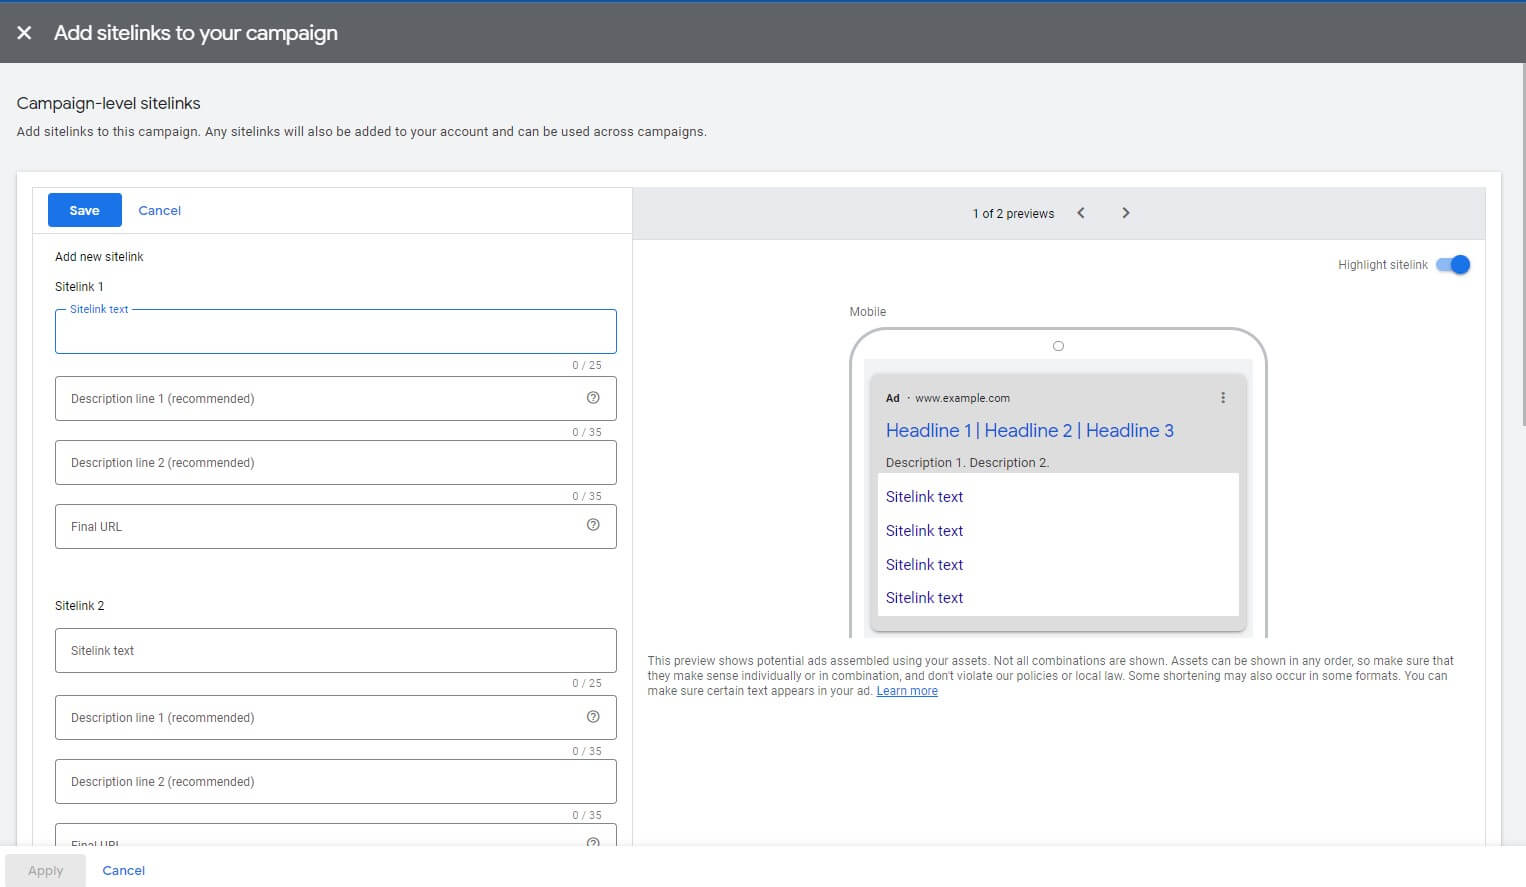
Step 10. Set up sitelinks
What are sitelinks?
Sitelinks are additional links to specific pages of an advertiser’s website that appear beneath the main ad copy when it is displayed in a search engine results page:
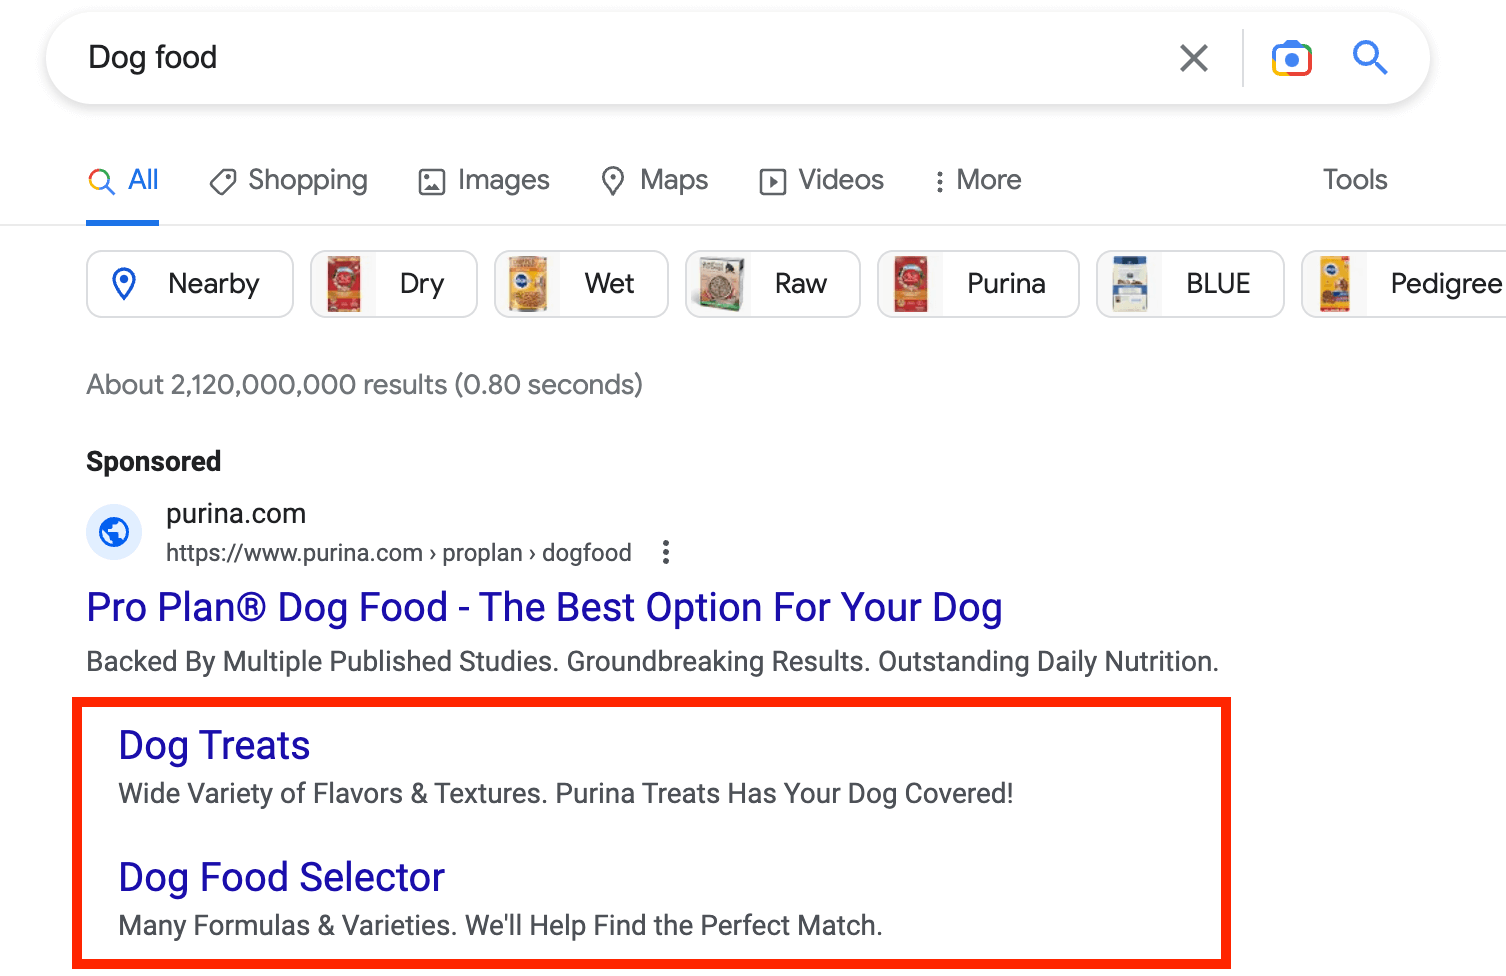
Sitelinks can help advertisers provide more options and information to users who are interested in their products or services. They allow advertisers to showcase a variety of offerings, such as popular products or services, landing pages, specific categories, or pages with special offers. This provides users with more options to explore the advertiser’s website and helps improve the chances of the user finding what they are looking for.
You can choose which sitelinks to display with their ads, and can also specify when and where sitelinks are shown to potential customers.
Here is how it will look like on this step:
Step 11. Create your CTA
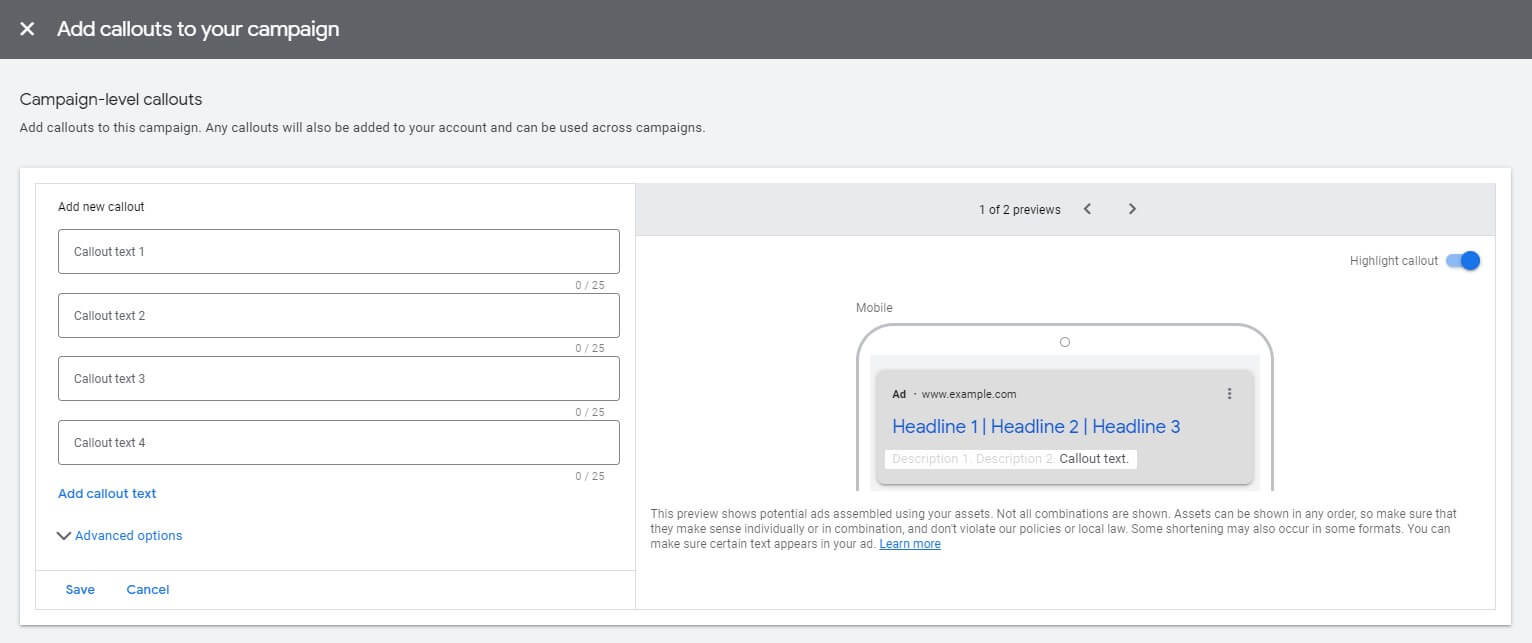
Callouts ad extension is an important part of any Google ads campaign. You can use them in several ways: to encourage users to take a specific action after seeing your ad, or to highlight unique features or unique selling points of your product or service, which is even more effective.
This is what you will see on your screen:
Here are some tips on how to choose the right CTAs for your Google ads campaign:
- Understand your goal
The first step is to identify what you want your users to do after seeing your ad. Do you want them to buy a product, download an ebook, sign up for a newsletter, or fill out a contact form? Your CTA should align with your campaign goal.
- Keep it simple
Your CTA should be clear and concise, and the language should be simple enough for users to understand. Avoid using industry jargon or confusing terminology.
- Create urgency
Use words like “limited time offer,” “act now,” or “don’t miss out” to create a sense of urgency and encourage users to take action.
- Use action-oriented language
Use verbs like “buy,” “subscribe,” “download,” or “register” to create a sense of action and urgency.
- Test different variations
Try out different variations of CTAs and see which ones perform better. You can use A/B testing to test different variations of your ad copy, including the CTA.
- Match your CTA with your landing page
Make sure your CTA is consistent with the messaging on your landing page. This will help reduce confusion and increase the likelihood that users will take the desired action.
Step 12. Finalize your ad creation
This is the final step to make some adjustments to your ad and use Google Ads assets to the most.
What are assets?
In 2022 Google ad extensions were rebranded as assets. Assets include the headlines, descriptions, links to specific parts of your website, call buttons, location information, and more that come together to make up the eventual ad format that is shown to a user.
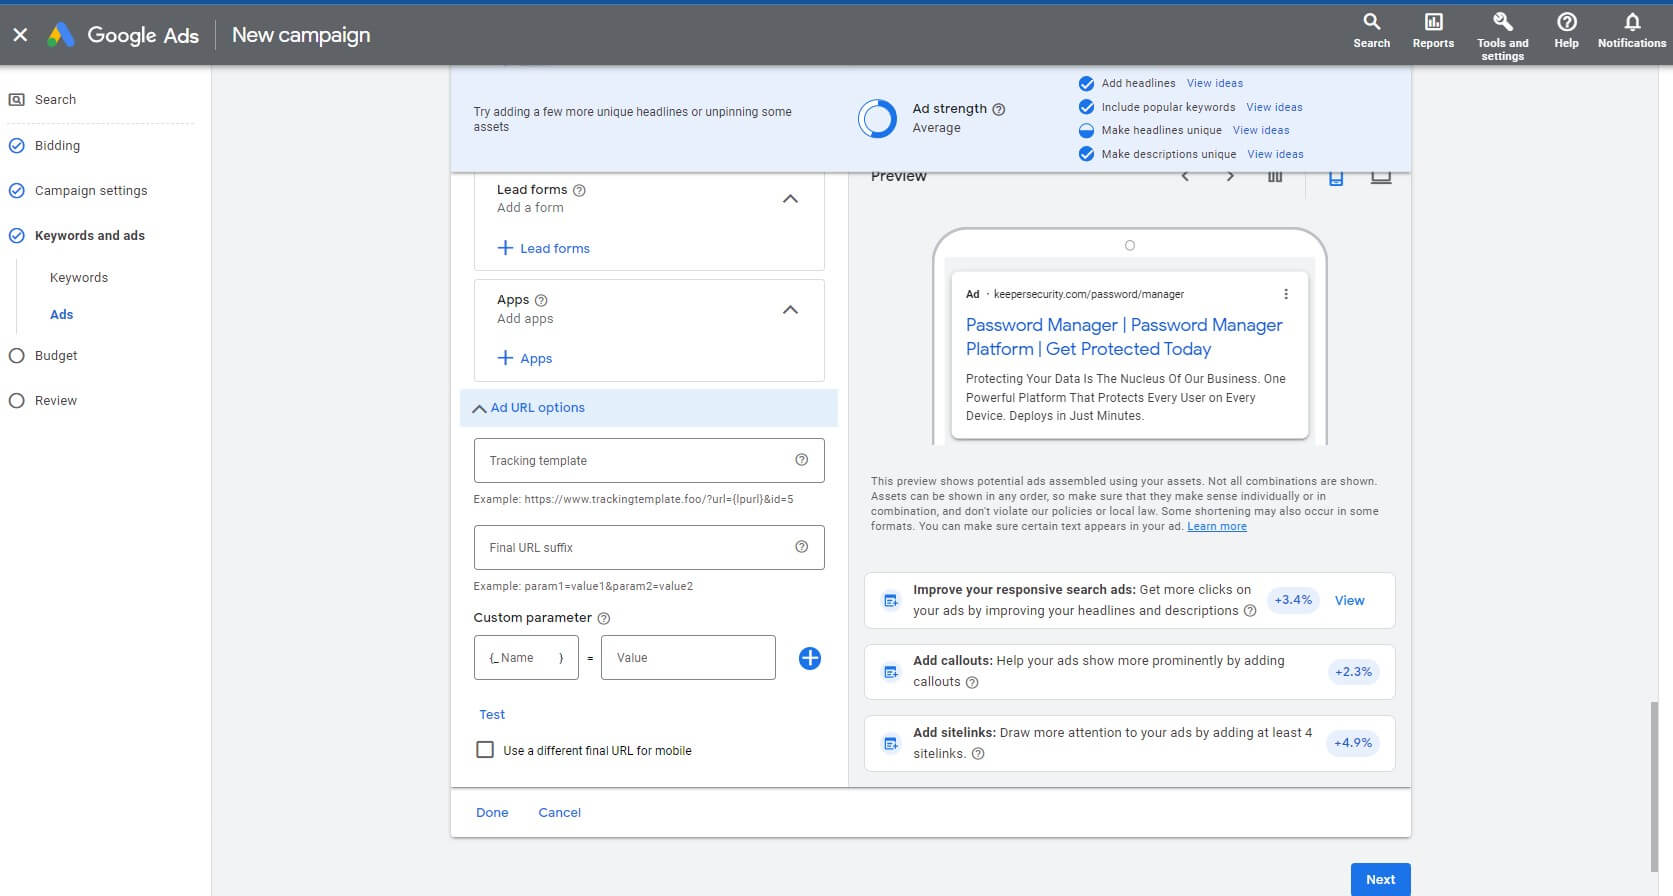
Another point which is worth your attention is the tracking template.
A tracking template is a feature in Google Ads that allows you to specify a URL parameter for tracking purposes. When you add a tracking template to your Google Ads account, Google will append the template to the end of the landing page URL of each ad. This enables you to track and measure the performance of your ads more accurately by capturing data about the source, medium, and campaign of each click.
The tracking template consists of two parts: the final URL, which is the landing page where the user will be taken after clicking on your ad, and the tracking parameters, which are the parameters that are added to the URL to track the source of the click. These tracking parameters are called UTM parameters.
UTM parameters provide Google Analytics with additional information about the source, medium, and campaign that drove traffic to the website. By using UTM tracking in Google Ads, you can track the performance of your campaigns more accurately, measure the ROI of your advertising spend, and optimize campaigns based on the data it collects.
Here’s an example of what a tracking template might look like:
{lpurl}?utm_source=google&utm_medium=cpc&utm_campaign=summer_sale&utm_term={keyword}&device={device}&matchtype={matchtype}
Where:
utm_source: identifies the source of the traffic, such as Google, Bing, or Facebook.
utm_medium: identifies the medium through which the traffic was sent, such as email, CPC (cost-per-click), or social media.
utm_campaign: identifies the specific campaign that the traffic is associated with, such as a summer sale or a new product launch.
utm_term: identifies the specific keyword or search term used to trigger the ad, in the case of search advertising.
utm_content: identifies the specific ad or creative that was clicked, in the case of display advertising.
Additionally, Google Ads uses Custom Parameters in order to make it easy to pass parameters and other information to the URL at serving time without hard-coding them in the Final URL/Landing Page or in the Tracking Template. Up to three custom parameters can be defined per object, and they have both a custom name and custom value. Custom parameter values have a maximum length of 200 characters.
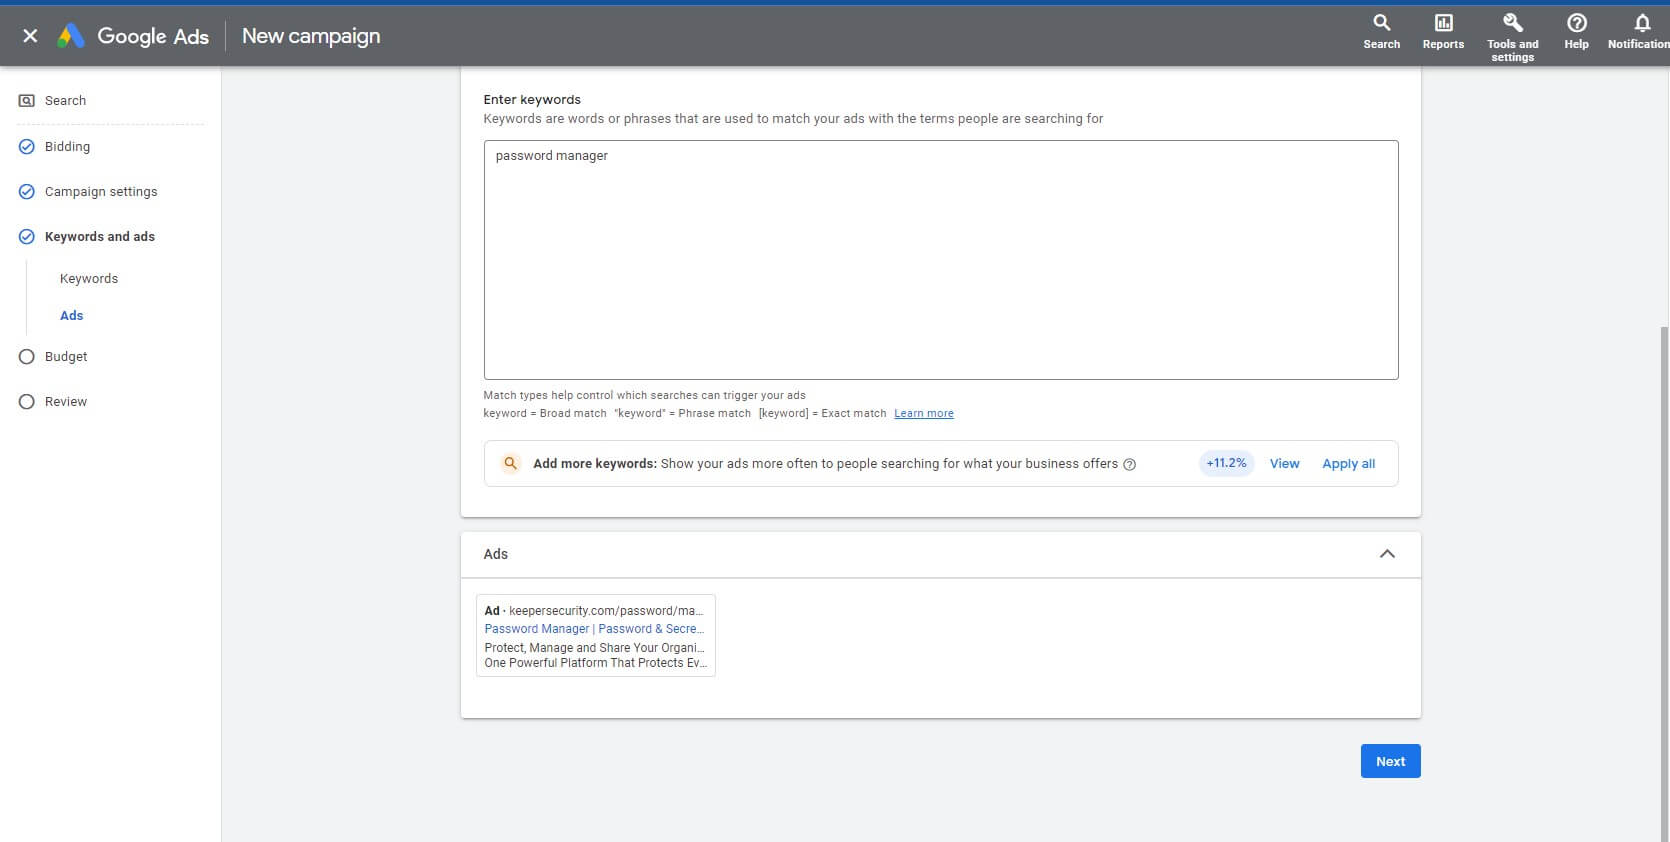
Step 13. Add more keywords
On this step you can add more keywords, as you see Google Ads shows you once again how important it is choosing the right keywords.
Step 14. Set up your budget
Determining how much you’re ready to splash on your ad can be a bit tricky: too little – and you will get stuck at this learning phase forever, too much – and you will drown your budget into empty.
First of all, just make a calculation: how much money you can spend in a month. Begin by conducting keyword research and examining industry-specific benchmarks in Google Ads to forecast your typical CPC or CPA.
Secondly, divide this sum by 30.4 (the average number of days in a month) to get your daily budget.
Here is how it looks on Google Ads:
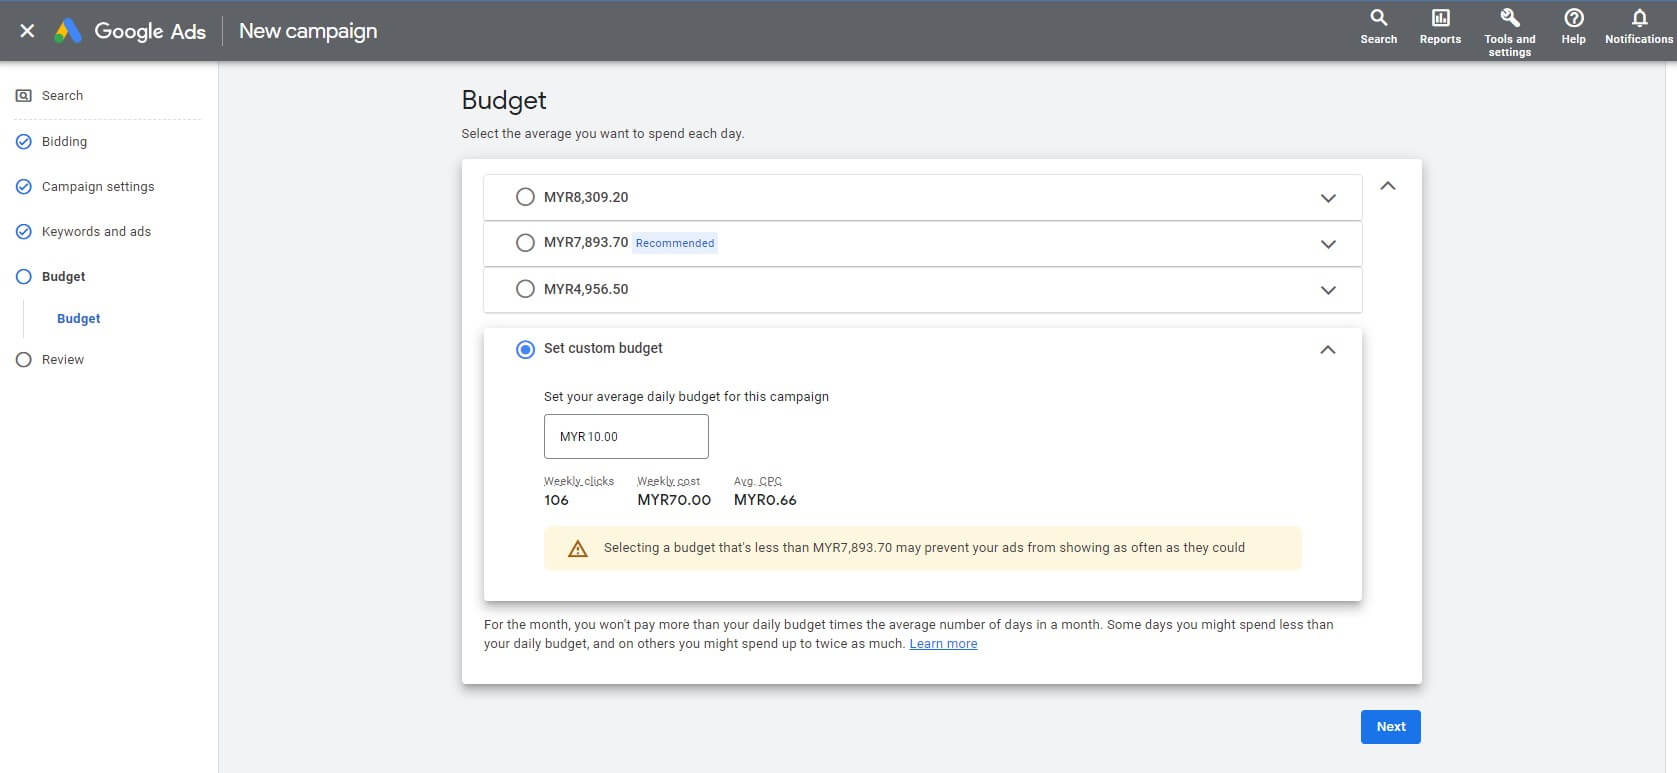
Keep in mind:
- Daily budget doesn’t stay the same every single day: when you establish a daily budget of $10, Google could expand $12 on a given day to yield more clicks and conversions, and then disburse only $8 on another day to balance out your expenses for the month, or even spend $20 on some day, and none on another.
- Your ad budget should change from time to time: in PPC, having some flexibility can lead to significant benefits. If the campaign doesn’t bring the results, there is no need for injecting more money into it, it can be a sign to switch to another campaign.
- Keep your finger on the pulse: monitor the Google Ads budget report to control the expenditures across your account.
Step 15. Review your campaign
You’re almost done! Just check everything one more time and take a look at Google recommendations:
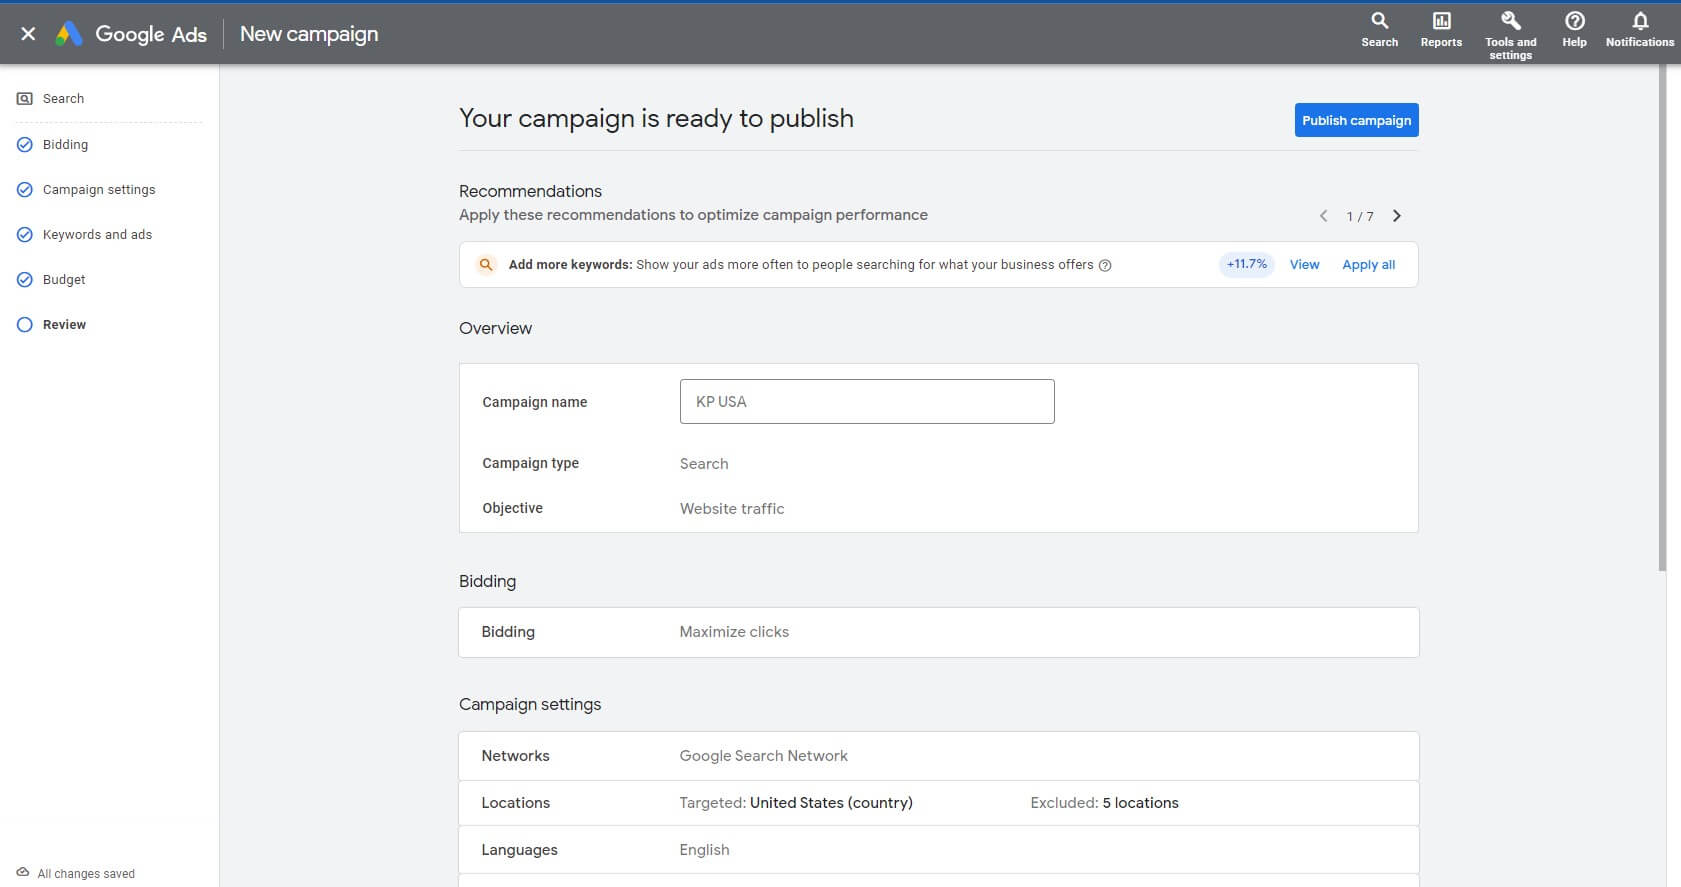
You can set your ad live!
Now what?
To position yourself for success in PPC advertising, it’s important to become familiar with PPC reporting so that you can easily pause or modify your campaign as needed. In addition, it’s advisable to gain a good understanding of essential PPC metrics that can help you identify areas for improvement in the future. It’s also important to remain vigilant for any potential ad disapprovals that could negatively impact your campaign’s performance. Other than that, you’re good to go!
—
Takeaway: In A Nutshell
Ok, this was a lengthy one! Probably, a bit too much information when you just read it, but believe us, it will be much easier once you start setting up your first campaign!
So, that’s roughly your algorithm of actions when starting with Google Ads:
- Switch To Expert Mode
- Choose your campaign objective and type
- Install the tracking code to your website
- Pick you bid strategy
- Choose the network
- Choose locations and languages
- Choose audiences
- Set up keywords
- Create your ad: add headlines, descriptions, URL
- Set up sitelinks
- Create CTAs
- Set up your budget
- Review the campaign
By the way, are you an aspiring affiliate?
We at Indoleads have 2000+ affiliate programs from 180+ countries that can be promoted via various channels. Want to get your access? It’s easy and free!